Lens to Lens- Part 2.
From concept to DVD, a flash of inspiration to flash of laser light.
This article first appeared in CQ-TV magazine, issue 214
In the last article we looked at the preparatory work that should go into a video shoot and hinted at some of the pitfalls to avoid. This article will conclude the shoot section and go into some detail on the editing procedures that glue the shots together into a meaningful sequence.
Talking heads.
The human kind, not the tape ones! Many shoots will have a close-up of someone talking, whether in narrative or interview style. Obviously, miss-aiming the camera so part of somebodys face is missing is not a good idea but less obvious is the magic box area that gives best viewing experience. In personal conversation we talk while looking eye to eye and the same principle applies when viewing someone in a recording. We focus our attention toward their eyes and keeping them within a particular part of the screen helps to concentrate that attention. Curiously, the scale of the face doesnt matter as much, forehead to nose or a full body shot makes little difference as long as the eyes stay in the magic box. The box extends from about one third to two thirds of the screen width and from half way up to two thirds up from the bottom.
The background.
For the most part, the background is incidental to the foreground and it should not distract from the topic of the video. Positioning the camera carefully can sometimes be used to put the topic in context though. For example someone describing a fence with a view of open countryside behind them would in most peoples minds infer it related to a wood fence in a farm or park while a view of a prison would more likely suggest a wire security fence.
A common video trick is to use a virtual background, that is, one which is electronically substituted for the real one. Usually this is done with chroma keying where the real background is exclusively of a colour which does not appear in the foreground. By ensuring there are no common colours, it becomes very easy to separate the fore and backgrounds into two images, usually the foreground is then superimposed upon a new back drop. Chroma keying is by no means the only way of splitting the image; luminance keying and matte keying are also used. Luminance keying uses lightness rather than hue differences to define the border of the foreground and matte keying uses a completely different image which may not even be related to the main one. Its rather like using a stencil to paint one shape over another. If you ever wondered how transitions that follow curved edges work, they are probably matte keyed, a demonstration will be shown later.
Using more than one camera:
Most productions can be made with one camera but unless meticulously planned and scripted, and the scene can be precisely repeated so it can be shot twice from different angles, two or more cameras would be far more convenient. The big problem when you have more than one camera is making the pictures match each other in colour temperature and contrast. I have made my own disaster movie using one DV camera and one 8mm analogue camera, both regarded as high quality models of their respective types. When viewed on their own, the pictures from both cameras played back with excellent quality but when edited together the differences were immediately obvious. DV was clean and sharp, the 8mm looked blurred and grainy. Cutting from one to the other made the differences only too obvious. Thankfully on that occasion, my customer never turned up to collect the finished DVD (or paid for it - grrr.)
There are a few tricks to minimise the differences between cameras, some correction can be made at the editing stages but making them as compatible as possible at the shoot is still the best way to save time later. Colour balancing is the first thing to get right. Different types of camera, possibly even different batches of the same model, will have different perceptions of colour and brightness scales. The idea of balancing colours is to align the cameras so their images are as closely matched as possible. Errors occur for various reasons, some electronic and some optical but there are ways to combat both forms. The first thing to do is record a few seconds of colour bars on the tape. Most good quality cameras have a built in colour bar generator which will be accurate enough for colour alignment. When playing back, any deviance from standard bars, caused by the tape and electronics, can be measured and compensated for electronically. That sorts out the hue and saturation matching but there is also a problem of what is white. We talk of warm white and cold white which in reality are just tints of red or blue, in themselves not that important but when clips with a reddish tint are interspersed with ones with a blue tint, even minor differences become plainly visible. The way to combat the tint discrepancies is to make all the cameras interpret the same white with the same levels of red, green and blue components. We call this white balance. On virtually all cameras there is a facility called auto white balance which attempts to constantly adjust the gains of the camera pick-up amplifiers to compensate for an overall tint in the image. For example, shooting in artificial incandescent (normal light bulb) light actually produces a very yellow tinted picture. Auto white balance sees the predominant red and green content (red and green mix to yellow) and reduces the gain of the red and green amplifiers while boosting the blue amplifier. Although useful for single camera work, the artificial re-tinting of the picture will not work equally across several cameras and will not help to align them together. To set the white balance accurately, the auto feature should either be turned off or if the camera supports it, it should be manually taught what white looks like. This is very easy to do and relies on nothing more than a sheet of white paper. Under ambient lighting conditions, each camera is pointed at the same piece of paper, and their white balance controls set to learn that they are actually seeing white. With all the cameras seeing the same white, it is fairly safe to assume they will also see the same shades of grey right down to black. Now when edited, the colour bars can be used to match the hues and the paper used to set the luminance levels, giving a good correlation between shots.
Finally, a trick when using DV or DVCAM cameras. These cameras record the time, date and frame number in every frame of video they store. Normally, you dont see this but it can be electronically retrieved from the tape if needed. There are good and bad points about these time codes, the bad point is that if there is no video already on the tape, they start counting from frame zero. The good point is they make synchronisation between cameras really easy. Starting from frame zero can be a real nuisance because if the tape is played back in mid shoot, to check what was recorded and then moved beyond the end of the recording to be sure nothing would be overwritten, finding no video it restarts the counter again. When playing back the result is the time code is no longer continually increasing and there may be several scenes with the same time codes. Fixing the time code is very easy, simply make a dummy recording on all tapes when they are new. Leave the lens cap on if you like and switch the microphone off but rewind the tape and make a recording right to the end of the tape. Now the tape has a contiguous time count on it that will be picked up wherever the tape is left on its spools.
When its in the can - the editing stage:
So your shoot is finished and you have one or more tapes in your hand, what next? You have two options, old fashioned linear editing or NLE, non-linear editing. Linear edits are achieved by lining up sections of tape and playing them back in sequence on to another recording machine. It is tedious and can be difficult to do accurately and without interruption to the sync pattern. You can think of it as being like cutting and splicing cine film. On the other hand NLE, which is normally done with a computer allows the edit cuts to be put together exactly and seamlessly. What makes computer editing so convenient is that normally, all the video footage is stored inside the computer at once, even if it originates on different tapes and in different formats. Rather than the old fashioned way of finding the cuts by hand and physically lining them up and joining them, we can now use mark-in and mark-out points on the stored video. These are nothing more than a note of the name under which the video is filed and a frame count into the file. Because computer files allow random access (meaning you can access anything at any time and in any sequence) you can jump from a mark-out to a mark-in instantly, even if they are in different files. The editing job essentially is putting the clips together by listing all the mark in and out points. When all the parts and cuts are decided, the computer simply makes a new file by copying the source files from the first mark-in to mark-out then from the second mark-in to mark-out then the third mark-in and so on. The resulting file is a seamless join of all the marked sections. Another plus to this method is that the list of mark-in and out points can be stored for later use or adjustment. It is of course important to keep the original video file or tape as knowing where to cut is useless without having something to cut into. The list of cuts is a plain text file called an EDL or Edit Decision List
GENERIC EDL CREATED BY MEDIASTUDIO 8.0
SMPTE FRAME CODE
NON-DROP FRAME
TITLE: Test for CQ-TV
0001 BLANK V C 0303 00:00:00:00 00:00:12:03 00:00:00:00 00:00:12:03
0002 200001 B C 1825 00:00:12:03 00:01:25:03 00:00:12:03 00:01:25:03
* 200001 IS LANTERN.AVI
0003 200001 B C 2606 00:01:25:03 00:03:09:09 00:01:25:03 00:03:09:09
* 200001 IS LANTERN.AVI
0004 200001 B C 1016 00:03:09:09 00:03:50:00 00:03:09:09 00:03:50:00
* 200001 IS LANTERN.AVI
0005 200001 B C 2820 00:03:50:00 00:05:42:20 00:03:50:00 00:05:42:20
0005 100001 V K A 2820 00:00:00:00 00:01:52:20 00:03:50:00 00:05:42:20
* 200001 IS LANTERN.AVI
* 100001 IS AUX
0006 200001 B C 8273 00:05:42:20 00:11:13:18 00:05:42:20 00:11:13:18
* 200001 IS LANTERN.AVI
* TRANSITION SUBFIELD: B- BORDER, S- SOFTEDGE, R- REVERSE
* KEY TYPE: R- COLOR KEY, L- LUMA KEY, C- CHROMA KEY, A- ALPHA KEY, G-GRAY KEY
* KEY SUBFIELD: T- SOFTEDGE, I- INVERT
* BLANK VIDEO IS WHITE VIDEO FRAMES
Most, if not all computer video editing packages use a time line principle. The idea here is to lay out the video and sound clips along a measuring scale, usually in frames or seconds. The scale shows the position of the clip in the finished production, so for example an event lined up with the 10 second marker will be seen or heard tens seconds from the start of the finished video. To ease clip alignment the time line is usually zoomable, that is, it can be expanded or contracted to a scale suited to the size and required accuracy of placement. If zoomed right in, the scale is usually in frames so that clips can be precisely aligned, zooming right out may show the whole production, maybe several hours of it, making it easier to visualise the placement of entire clips within the production. The time line will usually have several levels so that the position and duration of transitions and overlays can be aligned with the main video stream. There are also sound tracks of course and these are manipulated and cut in the same way as video but frequently not in the same places. For example the camera shot may change to one from a different angle while the same audio plays right through.


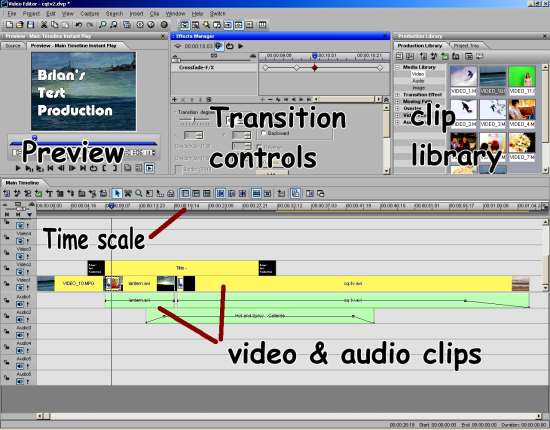
Being computer based and having instant access to all the video files makes it possible to view the finished production as you move through the edit, some people call this timeline scrubbing. It also allows you to go back and change a cut point or even swap cuts around with instant viewing of the results. Video files can be huge though and require considerable computing power to view in real time so an alternative method of editing called proxy editing which is faster but initially less precise is often available. Proxy editing relies on the fact that all we are normally interested in is building the list of mark-in and mark-out points, the quality of the picture isnt particularly important during the editing stage as long as the picture content is obvious. The proxy file is a low resolution copy of the video which uses smaller files and is much quicker to handle. When the cuts are decided, they are applied to the full quality version of the files to create the final production. This can be quite a slow process when high resolution pictures are being handled and frequently computers will be left running for many hours or even days to handle the full size files.
So far we have assumed that when a mark-out is reached, the following mark-in will happen immediately, there being an abrupt change from one source clip to another. Probably 95% of cuts are done this way but sometimes a gradual change from one clip to the next is desirable. The change may be a crossfade in which one scene fades out as the next fades in or fade to black followed by a slow rise to normal brightness. The change period is called a transition effect and can be far more adventurous than just a fade. A clever trick is used to determine which part and how much of one clip encroaches on to the other. Take for example a sideways wipe in which picture A is replaced by picture B progressively from left to right. This could be achieved by selecting the second source at an equal time from the left edge on each line of the scan and and slowly increasing the selection delay to make the switchover happen later along the scan line. This works well for clean cuts from A to B but is useless if we want to put a soft edge on the changeover. It is also very difficult to do if we dont want a straight edge on the changeover as the delay would have to be different on each scan line. We get around this difficulty by using a third, usually static image, to determine where the border between A and B should be.
Imagine your picture is what you see looking directly down into a rectangular fish tank. For sake of animal welfare, please dont try this at home, just picture it in your mind. Now imagine the base of the tank is white and standing on the base are several white objects. Looking from above, all you see is white. Now imagine you are slowly pouring black paint into the tank. At first, the base changes from white to black but the objects, being higher are still above the paint line so are still white. As more paint is put in the tank, the level rises and from above the white objects seem to shrink as they submerge. Eventually everything is covered and all you see is black. Thinking of nothing except the white and black, what you really would see is white changing to black in areas determined by the height and shape of the objects. The principle of using the height of the object to decide the colour of the area is a direct analogy of the way an image matte works except the shade of the matte rather than height is used. To make a transition gradual, the contour of shade is followed over several video frames and the contour line becomes the switch point from video A to B. For example, if the matte image was black on the left and white on the right with a gradual rise across the image, the cut of the transition would follow the shade from left to right (dark to light) and cut the picture at the same position. The result would be a sideways wipe. If that sounds like a complicated way of doing a simple wipe, imagine the matte is white in the middle and fades to black around all the borders, now the transition appears as a circle, decreasing in size to a spot in the centre of the screen. Thats not so easy to do other ways. Similarly a matte which is dark in one corner and lightens to white in the diagonally opposite corner would give a diagonal wipe. As you see, the possibilities of transitions using a matte are endless and inconceivably difficult to do with electronic switching. .
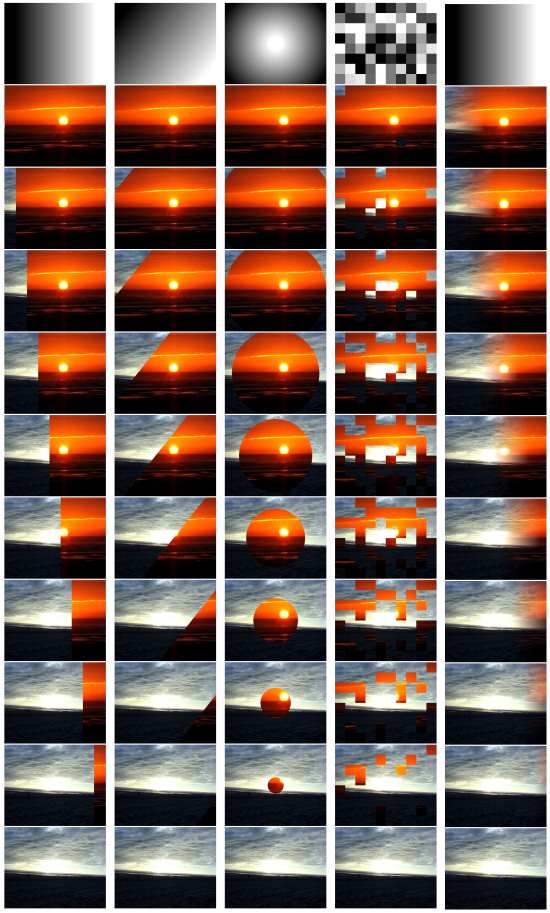
What we have seen so far implies an abrupt change from one image to the other, all we have determined is the shape in which the change occurs. It gets a little more complicated now but instead of the transition being a direct switchover at a given shade in the matte, think of a simple mathematical operation. Lets call black 0% level and white 100% level. Now take video clip A and at every point in the picture, multiply it by the percentage level in the matte. So if at some position on the screen the matte is 30%, clip A level at the same point is also 30% of normal. Now take clip B and do the same except instead of using the matte level, use 100 minus the matte level instead, in other words a negative image of the matte (100% becomes 0% and vice versa). At that same point, Clip B is now set to 70% level. The combined picture is a composite of A and B with the mix determined by the matte. Using the earlier examples, we have a gradual change of A to B from left to right, a vignette style with A in the centre and B around the edges or a gradual change from A to B across opposite corners of the screen.
Normally, the matte will be the same dimensions, that is number of pixels horizontally and vertically as the video clips themselves but this is not mandatory. It is also possible to use a moving image rather than a static one as the matte, in fact it can even be another video clip although it is easy to make a real mess of things unless care is taken. Normally a matte is a monochrome image as all we are really interested in is defining a shape by its shade. They can be used to provide some very clever keying effects though, for example the effect where one item in a clip is colour while everything else is monochrome. The trick is to duplicate the original colour video twice, once in monochrome and once as a matte. The matte has the item set to black (or white if you reverse the cutting direction) with everything else set to white - this is a fairly simple image painting operation. Now the matte is used to cut the colour image into the monochrome one. The desired colour object is switched in by the matte so it overlays the monochrome background. Clever and very eye-catching!
The other tool available at the editing stage is called overlaying. Unlike transitions where existing clips are mixed together, overlaying usually involves adding a new layer to the video production. It is sometimes easier to imagine and edit session as lots of layers stacked on top of each other with a transition or effect on each level. The base level is a blank screen and the video is built up on top of it. The viewer sees the levels from above so anything below is visible over the blank background. The principle of overlaying is that something, usually text or a logo, is put on a higher level than the rest of the video. Because it is on a higher level, it obscures anything below it and is visible at all times unless something else is placed above it on an even higher level.
Overlays are used extensively in commercial broadcasting to put identification logos or names in television pictures. Not only are they there to tell you what channel you are watching, they serve to preserve the copyright of the producer should recordings and duplicates be unofficially made. It is difficult, but far from impossible, to remove logos but the effort it requires makes the task economically unviable for pirates to bother with. There is no reason why the overlay should be static, it can also be another video clip, in fact when a sufficiently large overlay is placed in a picture we recognise it by a different name Picture In Picture or PIP. Scrolling titles and credits are another use of overlays, they are usually presented with a video clip behind them. They are nothing more than pre-made text files overlayed on the background scenes. The scrolling effect is present already in the overlay video, several software packages are available to help you put text into motion by applying moving paths to the characters.
Sound edits use a system similar to overlaying but rather than one clip completely covering another, they will normally be blended together . There will be instant cuts from one sound recording to another just as there are instant video cuts but there may also be background noises or music which needs to be present throughout a scene. These are normally added to the audio tracks in the time line so they can be faded in, out or cut in alignment with the video.
That sums up the brief encounter with editing, next time we will look at what to do with the edited production in order to make it suitable for distribution and look at the mechanics of producing a DVD.
Actual video clips of the wipe effects and the matte used to produce them can be found by clicking below. Please note that these are drastically reduced in quality to make them quick to download, in reality, the quality of the foreground and background images is excellent.
No fish were harmed while writing this article.
Short sample video clips of the transitions mentioned above are available on the downloads page. Click HERE to go to the files.
Please note that a bug in Windows Media Player may stop you seeing the first few frames of these clips. If this happens, let the clip play to the end then click on the play button again.


