This article first appeared in CQ-TV magazine, issue 213
Part one is below, click these links to Part 2 and Part 3.
From concept to DVD, a flash of inspiration to flash of laser light.
Ever watched a movie or TV show and thought I enjoyed that? Afterwards, thinking of what actually made it good. Ever switched channel to avoid a programme knowing you wouldnt find it interesting? Ever thought of why, and what makes some presentations appealing and some disagreeable? In this series of articles Im going to take you exploring and hopefully you will learn from my experience and from the tricks of the professionals, how to make eye-catching video and not sleep inducing monotony. Being technically minded, Im not going to lecture on directing and producing without looking at why things are done as they are and how the limitations of equipment and media determine the outcome. It will be a mix of planning, organising, psychology and electronics - not easy to combine in a written article so bear with me if we occasionally wander off course.
Planning your production:
Let me make it clear from the outset, when I mention production I mean anything from shots of the kids playing in the garden to your epic 10-part serialisation of Lord of the Rings on Skateboards.
You should have an initial idea of what your production is about before going further. Some irritating people can just grab a camera and make a masterpiece. The majority, myself included, need to plan ahead and make first guesses at what will be needed in terms of location and equipment. What you need to establish from the outset is who will be watching your video. If you are filming your pet Tortoise for blind Aunty Maud to watch on her 5 inch portable TV, dont go for widescreen high-definition modes. On the other hand, if you are shooting for HD digital broadcast, put that single-tube VHS camcorder back in the bin where it belongs.
Think also of the media your production will be stored and distributed on. If we sent out blue-ray, quad layer MPEG-4 video discs with this magazine, they may well contain 10 hours of state-of-the-art super pictures but nobody would have equipment to view them. Sending VHS tapes would grant a much wider audience but sacrifice the quality. As DVD is currently the most popular home media and can also meet broadcast quality specifications, thats what Im going to concentrate on. VHS is now obsolete anyway, except for a few specialised needs; all VHS production worldwide has now ceased.
Incidentally, a DVD is a physical thing, it defines the shape and properties of a plastic ring. It has nothing to do with what is stored on it or in what way the storage is achieved. Its the container rather than the contents. There are many types of common DVD formats and it is even possible to use CD discs to store video. More of this when we get to the stage of preparing a disc for playing.
The basic steps to making any video production are:
1. Plan.
2. Shoot.
3. Edit.
4. Record to media.
5. Distribute.
Let us look at these in detail.
Storyboarding:
This may seem like a trivial step that can be avoided to save time. My advice is spend more on this step than any other. Story boards are shorthand plans of your production. They can be entirely in the form of written notes or they can be sketches of the scenes you want to appear when shooting, usually, a mixture of the two are used. There are no rules about how you make them, they serve as hints to the camera operator and help you to group similar scenes together when more than one incidence of video from a location is needed. For example, there may be several scenes on a beach in your production but interspersed with scenes at other locations. By going back over the storyboard you can see how best to shoot all the beach scenes together rather than treating each of them in chronological order. The other advantage of storyboards is that they allow you to play around with the order of scenes, possibly adding to, or removing some of them to change the flow of the production. It is far easier to get it right in the planning stages than to go back and have to recreate scenes again on location when conditions may have significantly changed. At the shooting stage, it is vital to follow the storyboard instructions. It can be very tempting to make last minute changes or add an artistic bit to a scene only to find it completely messes up the final production when all the shots are pieced together. A golden sunset in the background might look lovely on camera but doesnt slot in very well between two mid morning scenes!
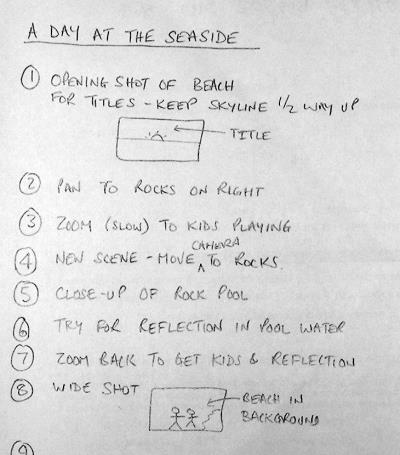
Part of a simple story board. It doesnt have to be precise or complicated but it has to be closely followed
Screen Format:
Almost all professional video these days is shot in 16:9 (widescreen) format. The numbers are just the ratio of width to height of the picture, the actual units are irrelevant. It could be 16cm wide by 9cm high or 16inches by 9 inches, only the ratio is important. Older non-widescreen TV uses a ratio of 4 wide by 3 high and computer screens typically use 1.25 wide for 1 unit of height. It is important to know which format you are going to use for your final product as this effects every step from shooting to disc production. Probably the best format to shoot in is 16:9 as most TV sets and computers can be set to show the full picture in this mode, even if it means showing a border around it. A word of warning, some camcorders claim to be widescreen compatible, note the wording carefully. Being compatible with widescreen doesnt mean it actually is widescreen. In fact most compatible cameras use a trick to scale the picture to fit the full area of a widescreen TV screen. They mask off the top and bottom of the picture, reducing its height, then add a signal top the tape to say it is a real widescreen picture. When played back, the picture size is expanded to fill the screen but at the expense of losing all the pixels hidden under the top and bottom masks.
From a shooting point of view, use 16:9 if possible but imagine a 4:3 box centred on the picture and try to keep any relevant action within it. Sometimes, drawing a 4:3 box on the viewfinder helps to show the compatible area. Most people watching 16:9 on a 4:3 screen will not see the area to the left and right of the box at all so avoid using it for anything other than background scenery and never let any action critical to your story fall within it. Computer screen format is close enough to 4:3 for no real problems to show so the same rules as for 4:3 should be followed.
The distribution media should also be taken into consideration, DVD video is capable of telling the TV to be 16:9, 14:9, 4:3 and possibly others too. However, other types of video disc are used, particularly VCD in Asian countries and this does not allow all these formats to be selected. It does not stop them being used but it has no provision to automatically set the TV to the required mode. The viewer has to manually change the screen format if their TV allows it. For this reason 4:3 is more common on VCD. Because of the lower resolution of VCD pictures, it generally isnt satisfactory to view on widescreen by masking top and bottom out then stretching, the picture to fit as the individual picture pixels become annoyingly large. While on the topic of pixel size, the number of pixels across and down the screen depends on the TV standard being used, PAL or NTSC but the number is the same regardless of the picture being 4:3 or 16:9. When 16:9 is used, the pixels are elongated to make the picture wider, there are not actually any more there.
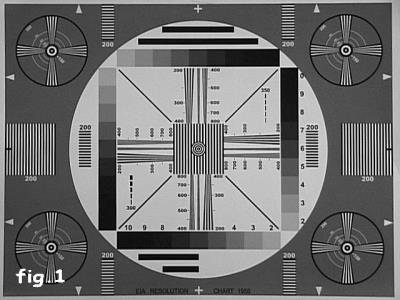
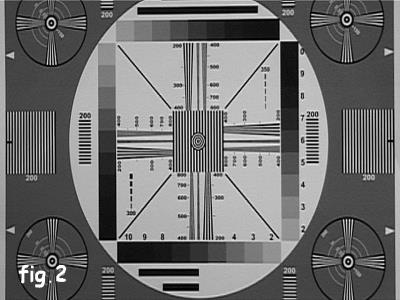
These two images are of the same original card and shot from the same distance and with the same zoom level and the same camera.
Fig.1 is shot with the camera set to 4:3 aspect ratio, in Fig.2 it was set to 16:9.
The picture geometry is correct in both images when viewed with the TV set to normal and widescreen modes respectively. When the lower picture is viewed widescreen it is stetched horizontally so the central white area becomes a circle again.
Note how some of the top and bottom of the 16:9 image have been cropped to fake the width increase.
Access and resources:
If your shoot is at home you should not have a problem with permission to use your camera but elsewhere you may need to enquire first. In fact, it is best to enquire anyway, a simple verbal request or letter will suffice and is rarely refused. You need to avoid the situation where someone recognises their property in your video and objects to it being shown to others. This is understandable if the property owner has had trouble with intruders for example and you are publicly displaying an advert for it to happen again. That letter could well save your bacon if an objection is raised and save you having to re-shoot again somewhere else. Other places to be aware of are near airports, military bases and government buildings. In these places the chances are that someone elses camera is trained on you and recording you recording them!
If your production requires specific lighting conditions, make sure that you can provide and sustain them. Using floodlights, spotlights or any lighting indoors will generally give a constant amount of illumination and from the same direction. If your shoot is outside though, and especially if using only natural light, you need to be careful that the amount and direction of the light will remain steady for long enough. Our eyes have a wonderful ability to adjust to different lighting conditions but cameras are annoyingly honest about what they see. For example, we perceive items to be the same colour when viewed in daylight or artificial light but a camera would see things tinted blue or yellow under the same conditions. If you want to see how much we adjust our eyesight, try pointing a camera at a colourful object such as a flower and flick the white balance switch between its different settings, the amount of compensation the camera adds is amazing. If your shoot is likely to take more than an hour or so you may need to take into consideration that shadows will have moved. If this is the case, you may do well to shoot over more than one day so similar lighting directions can be expected. Keep an eye on the weather forecast if you do this or you may find your shadows have disappeared anyway!
Most shoots will need at least two cameras. You can manage with one but it is far more difficult to keep sound and picture in sync when shifting from one view to another. Take for example the classic TV dialogue between interviewer and interviewee, unless you can persuade them to freeze while you move the camera from looking at one face to the other, you will have a discontinuity. Nobody wants to see the effect of the camera swinging about and re-focussing because it distracts from the topic of conversation. What you would typically do is use two cameras, one trained on each person but only use one sound track. The sound could be from just one of the cameras or a mix from both or could be from a separate microphone. The sound would eventually run all the way through while the video would cut from one camera source to the other. The last thing you want is different background noises and tonal quality as you switch camera scene so keep to the same sound recording throughout if possible. If fixing is necessary to mask sound problems or align lip-sync it can be done at the editing stage which we will be visiting later.
For static shots always use a tripod, even with the anti-shake facilities on newer cameras you still see some movement. There are two kinds of anti-shake cameras, one uses a mechanical damping system that actually moves the CCD and/or the lens structure so it can move independently of the camera body. The other system uses electronic compensation where the corner coordinates of the image are moved so the window they define appears to be stationary. The latter system often gives poorer performance, both because it sometimes misjudges which parts of the picture should and should not be in motion and because they steal pixels from the image border to allow the slightly smaller visible window to move within the full sized picture.
If tripods are not appropriate, for example when the camera is travelling or is being used where the ground is too uneven, try to make it as heavy as you can manage. This may sound crazy when manufacturers strive to make cameras as lightweight as possible but the extra mass will dampen any sudden movement very effectively. Remember though, that the accessory sockets and mounting screw have limited strength so dont hang house bricks on the headphone jack!
Finally, dont forget the human element, two cameras probably need two cameramen!
Choice of camera:
You dont have to look far to see adverts for cameras and camcorders, all the daily newspapers and magazines are full of them and they all claim to be best. To some degree the claims are probably true, some cameras are best at some jobs, others are better at other jobs. What you need to decide is which has all the facilities you need for your productions and of course which is within your budget. What certainly is true is that most new camcorders, even at the budget end of the scale, surpass the quality of professional cameras of only 5 or 6 years ago.
Some cameras record to tape, some directly to DVD media, lets look at the pros and cons of each of the common types.
VHS - awful definition, poor colour rendition, poor sync stability. About 240 lines of resolution. Not a lot going for it really.
SVHS - records chroma and luminance signals separately which greatly improves resolution and colour quality. Resolution increases to about 400 lines. Tapes are fairly expensive.
VHSc and SVHSc - the same as VHS and SVHS in terms of quality but in smaller cases and with shorter running time.
Beta - plagued by so many different and incompatible types. Good to excellent quality, bulky tapes and expensive. max and low band formats give about 350 lines of resolution, high band gives about 500.
MiniDV - digitises the picture and records the numbers. Excellent quality, small and very inexpensive tapes. MicroDV is an even smaller variant of the same system. Around 500 lines of resolution.
DVCAM - exactly the same recording method as MiniDv and MicroDV but uses a larger tape format with wider recording tracks to make drop-out less likely. This is probably the most widely used professional format at the moment.
DVD - excellent picture quality, media costs pennies. A serious drawback though is that they compress the picture using MPEG2 technology. This maximises the recording time but makes the resulting video very difficult to edit afterward. Resolution depends on picture content but around 400 lines.
The type of imaging device plays a large part in the picture quality. Older vacuum tube types tended to give poor quality and suffered colour drift as the three tubes aged at different rates. They also tended to suffer from ghost after images and trails following bright spots in the picture. Thankfully, most of these cameras have been retired from service; I have seen them on sale for £5 and nobody taking interest in them! Later cameras use CCD (Charge Coupled Device) sensors that are much smaller and give dramatically better results. The issue now is whether to use a single CCD camera or a three-CCD camera. A camera with a single CCD uses a striped colour filter in front of the sensor. The stripes are arranged so they filter out unwanted colours from the image before the light falls on the sensor surface. One stripe passes red colours, one green and one blue. The area on the CCD chip on which each colour lands is electronically routed to the appropriate colour processing circuits. In a three chip system, instead of seeing each colour through a striped filter, the whole image is split and passed through optical filters, each allowing only one colour through to one of the CCD chips. This system gives better definition as the image isnt divided into three regions on one sensor but one region on three sensors. The downside is of course three times as many CCDs and processing circuits are needed so the cost is much higher. In my own opinion, the better quality is worth paying for.
No matter how many CCDs the camera has, they still have to be scanned to read the light levels focussed on each pixel of the chip. Two scanning methods are used, progressive scan and interlaced scan. Normal TV pictures are interlaced, that is, the even numbered lines and odd numbered lines are scanned alternately. Computer screens normally are progressively scanned, meaning all the lines are sequentially scanned from top to bottom of the picture. Mixing the two can give strange results. If you view progressive on an interlaced system and vice versa you see an effect rather like the teeth of a comb to the sides of moving objects. The teeth are on alternate scan lines and are caused because of the time delay between the odd and even scans of the CCD. Even at 50 or 60 scans per second, there can be significant movement in the target object between scans. When viewed on the wrong system, the image from the odd and even scans are displaced by the amount the target moved. When it is necessary to use the other scan system there are usually options to counter the effect. The simplest way is simply to discard either the odd or the even scan lines and duplicate the other ones in their place. It halves the vertical resolution but is still more pleasant to the eye. Most professional cameras use progressive scan so they are compatible with computer displays and high-end editing facilities. It is easy to convert progressive scanned pictures to interlaced ones for TV use but difficult to convert the other way around so being more versatile, progressive scan is the preferred system.
Regardless of how the picture is stored in the camera, you still have to be able to transfer it somewhere else to be edited. On most cameras there is a video and audio output which can be connected straight into a TV set. While this could be very useful for monitoring your shot on a bigger screen and listening to your audio on headphones or through an amplifier, it isnt really satisfactory for recovering your shoot so it can be edited or even viewed at home. The reason is simple, the playback is analogue and will be encoded into NTSC or PAL composite video format which limits the usable bandwidth. In the capture process where the video is transferred to the editing facility, the encoded signal has to be decoded back to colour and luminance information, further limiting the bandwidth and adding other undesirable conversion effects. The solution to the problem is not to use analogue at all, use DV format whenever possible. Many models of DV cameras are available and as their popularity grows, analogue formats are being squeezed out of the market. DV, being digital is not compromised by the effects of tape drop-outs (unless very severe) and is relatively immune to minor tape transport variations, the effect that causes noise bands and pulling on VHS tapes.
When it comes to transferring DV to computer for editing there are two choices, USB and IEEE1394 (also known as i.Link and FireWire), both connect by a thin cable. USB comes in two types, plain USB and USB2, the original plain type is unsuitable for serious video work as its data carrying speed is much lower than needed for anything but the lowest quality video. USB2 does work fast enough for good quality video but the best performance comes from the IEEE1394 interface. This is the one to look for if you are buying a new camera or camcorder. Newer Apple computers have IEEE1394 sockets built in to them, on PCs, an extra card will usually have to be fitted but these only cost about £10. Incidentally, there is absolutely no difference in quality whatsoever between cheap and expensive IEEE1394 cards so go for the lowest cost one you can find.
When shooting at home, power your camera from a mains adapter if possible. Before doing any serious filming though, make a short trial video of a plain mid-grey background and under quiet conditions to make sure you do not have video hum bars or sound buzzing. You will see these when playing the tape back more than when recording. If you are using a computer to edit your video, try playing back into the computer beforehand too because sometimes a ground loop can be created through the cables and this can also cause hum problems. Running from batteries will of course remove any possibility of ripple in the supply voltage but do be careful that you have enough power capacity to complete your work. Older cameras used Nickel-Cadmium batteries which had an annoying tendency to work fine then suddenly go dead without warning. Lithium Ion batteries are much better at giving warning before dying and often, inside the battery casing, a small monitoring circuit checks the remaining power level and reports it back to the camera. Dont do what I did once - make a whole recording with the battery level icon superimposed on the picture !
Going back to the visual aspect of shooting, most cameras have evil functions in them called Automatic Level Control and Automatic White Balance. These are fine and can be useful if you have to shoot without prior setting-up, for example if you spot something unusual and just have to capture it quickly. For more serious work, turn these off and manually set the levels for best results. In the next article we will look at the optimum way of setting up the camera or cameras to make sure they give similar colour renditions.
Only the most expensive cameras have interchangeable lenses but virtually all cameras have the ability to have lens filters or adapters fitted to them. A tele-adapter giving x2 zoom and a wide-angle adapter are useful additions to your camera kit. These lenses are quite inexpensive and simply screw on the front of the cameras existing lens assembly. Mine uses a 52mm diameter mount which means I can use some of the filters and lenses from my stills camera. Beware of an optical effect of using adapters; you can sometimes chop the corners off the picture while zooming. It happens when the viewing angle takes in the edge of the lens mount. Theres little you can do to stop it so get to know the point the corners will disappear and dont go beyond it. Remember too that the viewfinder on the camera often doesnt show the extreme edges of the picture so the corners may be chopped out slightly sooner than expected.
Never, never, never, never even dream of thinking of using digital zoom. Some cameras on the market boast of as much as 800x digital zoom as though it is something to be proud of. When you consider that PAL format has the highest resolution at 720 wide by 576 pixels high, if magnified 800 times you get less than one pixel filling the whole screen! There is only one way of retaining all the pixels, and hence highest resolution, while zooming and that is to do it optically.
Earlier we looked at the cheating way of making 16:9 widescreen pictures from 4:3 by masking the top and bottom off the picture. In other words, not really making the picture wider, just making it less tall to get the right aspect ratio. Although the resulting picture fills the screen, some of the definition is lost because we are now enlarging a smaller picture by making the remaining pixels bigger. The real resolution changes from 720x576 down to about 720x405 and the screen is magnified by about 1.4 times. There is a way of preserving the full resolution but it is very expensive. The trick is to use an anamorphic lens that sees the wide picture but optically squeezes it so it appears narrower. Now, the full widescreen shot can be made narrow enough to fit in the 4:3 frame and all the pixels are still being used. Of course, if you view this through the viewfinder or play it back on a normal TV, everything looks too thin but if you view in widescreen, the pixels are stretched horizontally to normal width again. Clearly this is a better way of shooting a widescreen picture but the lenses can cost almost as much as a new camera. If anyone has an unwanted anamorphic lens for a Sony TRV900E and is feeling exceptionally generous - please get in touch!
The next article in this series will look at transferring shots from camera to computer and some of the ways they can be edited together to produce a complete presentation


